|
Building
a Slitter
Your design SHOULD differ, reflecting
alternatives in both
design
and construction. You may choose to
build your own, or purchase one. I use a 16mm to
Minox slitter block, described below and made by
Ray
Pepalis ,which works perfectly in my base.
(Note: Two of the previous references are to the
Sub
Club, one of the most impressive efforts on
the internet. Spend some time there!). I have used,
with great success, the
Minox
Film Slitter (picture below) which is
small, easy to use, and provides excellent results
with minimal film loss.
|
The object of this exercise it to make
a film slitter with readily available
materials. Slitting and loading one's own
film has two advantages
- The ability to use film types not
commercially available.
- Minimal cost per roll.
|
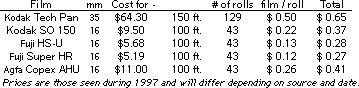
Examples at the right reflect
1997 prices and the use of
PMK
Pyro as a developer. The
cost of 50 liters of PMK working
solution is $25 plus shipping.
Some developers are more
expensive, and others less.
For color work, I prefer
factory loads of
Minocolor
PRO and
Minox
Processing Laboratory
processing.
|
|
|
|
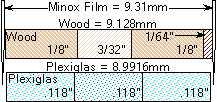
Minox film was originally defined as
1/4 the width of 35mm film, 8.75mm, with
an image size of 6.5mm x 9mm. When the
image size was enlarged to 8mm x 11mm, the
film width was increased to 9.4mm (or
9.5mm depending on what you read).
In practice, 9.4mm is TOO WIDE for
"home" slitting! 9.1mm
to 9.3mm is probably the
best range. See "Caution" below.
|
|
|
|
|
Wood Version. Compared with
plastic (Plexiglas, etc.),wood is
- less stable & more subject to
humidity changes,
- lighter,
- easier to work, but more difficult
to get the correct thickness.
CAUTION! If using
unlaminated wood, be sure of careful wood
type and grain selection to minimize the
possibility of warping. My preference is
for Plexiglas or laminated wood.
Wood in the dimensions shown should be
readily available in U.S. hobby and model
shops. In practice, the thickness
of the glue and clamping pressure has an
influence, and the pieces may be too thick.
Thickness should be verified and
adjusted.
Wood often has a fine "fur" which holds
glue and increases the final thickness. I
have found it useful to sand the wood
lightly with VERY fine sandpaper before
gluing. 30 minute epoxy and VERY tight
clamping with a bench vise gives me almost
exactly the correct thickness.
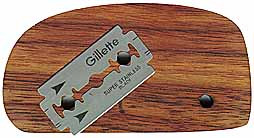
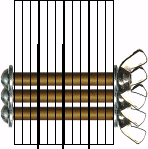
Using a properly positioned razor blade
as a guide, I carefully drill the three
holes for the brass tube, bolt, wing-nut
system shown below in the Plexiglas
version. After using a screw driver for
years to hold the round head of the bolt
while tightening the wing nut, I was
rudely awakened when I received Ray
Pepalis' slitter block with a lock washer
between the bolt head and the wood (or
Plexiglas), permitting "screwdriverless"
operation. Thanks Ray!
|
|
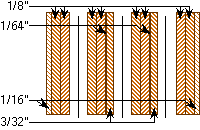
Plexiglas Version. My original
Plexiglas sandwich of four sections of 3
pieces each has worked successfully for me
for years. It uses brass tubes, through
which pass bolts with wing-nuts. 1/8 inch
Plexiglas, from my supplier, has a
thickness of 0.118" rather than a full
0.125". Check with your supplier. BE
SURE to check the thickness of the
Plexiglas (acrylic sheet) you use, ...
thickness may vary! Mine would benefit
from a couple of Hollerith (IBM) Cards for
additional spacing, but better too narrow
than too wide!
I use a liquid glue made especially for
Plexiglas type material and laminate the
three layers prior to drilling and
shaping. A friend found a service to mill
the proper thickness from a single piece,
avoiding the lamination process and
assuring the exact dimension.. The shape
was the same as shown above for the wood
model.
|
|
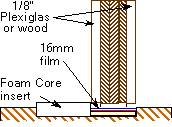
Slitting 16mm film to make 9.3mm
Minox loads. Make a Plexiglas (or
1/8" wood) segment for each side of one of
the center segments. This will give you a
sandwich with 2 blades which approximates
the width of the 16mm film. Cut a piece of
foam core (or laminate mat board) to fill
one side of the trough, leaving 16mm for
the film. Cut a 16mm wide piece of museum
board for the bottom of the trough.
|
The razor blades are mounted at an angle so that
as the stripper is pushed along the 35mm film,
clean cuts are made. The blades should protrude
about half the thickness of the museum rag
board on which the film is placed (like adjusting a
mat-cutter blade). Since the razor blades have four
corners, and since blades are cheaper than film, I
generally "rotate" the blades to a new corner after
6 to 8 passes. Kodak Tech Pan film which has an
Estar-AH base may require more frequent blade
changes! BE SURE you have clean cuts with no
ragged or rough edges or debris which provide
resistance and/or might foul the camera! The film
should easily pull out of the cassette to prevent
undo stress on the camera's film advancing
mechanism.
CAUTION! The film, when rolled and
inserted into the supply-side chamber of the Minox
cassette, MUST NOT protrude above the rim of
the cassette, rather, it must be just below the
rim. Because of curl, it is VERY difficult to
judge the width of either a factory-load film strip
or yours. To know when your film is the correct
width, roll up a factory load, insert it into the
supply-side chamber of a cassette, note how far it
is below the rim, and make yours the same width ..
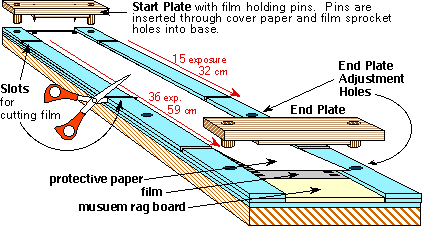
My original film holder was made from a scrap
piece of board with the side guides built-up with
mat board, and small nails over which to hook the
film. It lasted 20 years. I have since replaced it
with a single piece with the trough routed. I use a
piece of museum rag board in the bottom of the
trough and place the film, face down, with a 35mm
wide strip of adding machine paper over the film to
prevent scratches.
The wooden START PLATE
and END PLATE
are identical except for two nails in the
START PLATE which are
pressed through the paper and film into pre-drilled
holes in the base, and act to hold the film and
protective paper during slitting. The END PLATE is
used to stop the slitter at the proper film strip
length, and should NOT be pressed tightly against
the film.
|
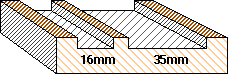
If you are interested in film types
which are available only in 16mm width,
you may wish to cut a second trough in the
film holder base to fit the 16mm film and
slitter above, eliminating the need for an
insert to narrow the 35mm trough.
|
|
|
Exposures
|
Film Length
|
|
After building the slitter, I made
sample cuts using paper only to determine
the position of the End Plate, and
to mark the location of the film strip
start and end. Saw cuts were made forming
Slots the width of a scissor blade.
|
|
15
|
32 cm
|
|
12.9"
|
|
30
|
52cm
|
20.3"
|
|
36
|
59 cm
|
23.2"
|
|
50
|
77 cm
|
30.1"
|
|
You will need something to aid in the
insertion of film into the supply chamber
of the cassette. I have had good success
with a simple piece of 1/4 inch dowel with
a thin slot cut in the end. I used a
jewelers blade for the cut so film just
slips in (and out) easily. To aid later in
the alignment of the takeup spool and
takeup chamber cap, I have wrapped the end
with "Artists Tape" to build up the
diameter to just slip through the opening
in the take-up chamber cap.
|

|
|
Variations and
suggestions by Bill Hoy of Bedford County,
VA
I used furniture-quality plywood for
the base because of its dimensional
stability and smooth surface. Instead of
milling a 35 mm wide groove (which would
have been a mess in plywood), I built up
the sides of the groove from storebought,
smooth planed oak. Folded newsprint makes
a good gasket between the groove pieces
and the base. Use a sharp Exacto knife to
trim the gasket paper flush.
You should measure the film length
precisely before you cut the grooves for
the scissors and put countersunk screws on
either side of each scissor groove to hold
the side pieces in place. Do this BEFORE
you cut the scissor grooves, but be
careful not to hit a screw with your
expensive saw blade!
Instead of using mat board at the base
of the 35mm groove, I used a narrow kerf
sawblade to mill shallow grooves for the
blades to travel in. I put paper above and
below the film before I slit it to avoid
scratches.
I made my blade holder out of a solid
piece of hardwood. I happened to have a
fairly long piece of 2 1/2 X 4 1/2 by 2
foot piece of very well aged walnut I had
been given. I drilled the holes for the
blade holders and the clamping bolts into
the end of the piece first, then sliced
approximately 9.5 mm pieces ACROSS the
grain. This is important because wood
swells and contracts with humidity along
the long portion of the grain. Very little
dimensional change occurs across the
grain. I then sanded the thicknesses to
film width: sanding, slitting and then
loading the film into cassettes. If the
camera opened and closed with difficulty,
I knew I was still too wide. Back to the
sanding block.
|
|
Shim Material
by Mike
Taglieri.
Use junk film rather than cardboard,
etc., for shimming the blades. Clorox
bleach will take the emulsion of film
completely off (put on straight, it strip
the emulsion in seconds), leaving you with
clear plastic that's very dimensionally
stable, and I've often used this for
shimstock. With the emulsion on, you have
a gelatin layer that can absorb moisture,
change thickness, etc. Without emulsion
it's just acetate, and you can get
different thicknesses of shimstock
depending on what film you strip.
|
|