|
|
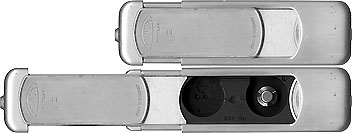
 When open, a small
curved indentation is visible on
the back of the camera.
Depressing it with the thumbnail
will release the back cover,
allowing it to slide open
revealing the film chamber. When open, a small
curved indentation is visible on
the back of the camera.
Depressing it with the thumbnail
will release the back cover,
allowing it to slide open
revealing the film chamber.
With the early models (A &
B) the film gate will close when
the camera is pulled completely
open. The body must be pushed
closed SLIGHTLY ( you
can see the film gate open) to
release the film.
With the film gate open and
the cover clear of the film
cassette, the film should fall
out with a slight tap (on the
hand, NOT
on the table!).
|
|
Today's automatic cameras are marvels of
engineering and do nearly everything for you, at a
cost. The 8x11mm Minox cameras are also marvels of
craftsmanship, ingenuity, and convenience, BUT also
at a cost. The cost is minimal, but important.
You must load and unload the film according
to a proper procedure!
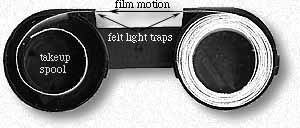 The cassette, shown
without the covers and with white paper for film,
shows the film being pulled from the supply chamber
at the right and wound onto the take-up spool at
the left. The Minox has an ingenious mechanism
which maintains equal spacing between the frames,
even though the film on the take- up spool is
increasing in diameter, requiring less and less
rotation of the drum with each film advance. The cassette, shown
without the covers and with white paper for film,
shows the film being pulled from the supply chamber
at the right and wound onto the take-up spool at
the left. The Minox has an ingenious mechanism
which maintains equal spacing between the frames,
even though the film on the take- up spool is
increasing in diameter, requiring less and less
rotation of the drum with each film advance.
For the camera to know the rotation needed for
the "next" frame, it must be told when a new roll
has been loaded. You must provide this information
by ALWAYS loading a new cassette in
accordance with the instructions in the owners
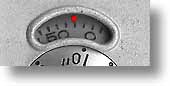
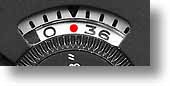
manual. The frame counter (examples shown below)
has a "Loading Mark" in the form of a red DOT (or red
BAR), and MUST be so positioned
before inserting a new roll of film.
PLEASE NOTE that the new Minocolor
PRO film for Minox 8x11mm is packaged in 30
exposure cassettes (a new length), with special
counter setting instructions, for each camera
style, included with each cassette.
|
Minox Riga, III,
IIIs, B and some early Cs
- Frame counters start at zero and
end at 50 (50 exposure film was
discontinued in the late 60's).
- Counter indicates the number of
EXPOSED frames.
- You must remember the length
(exposure count) of the film you have
loaded.
- After the last exposure, open and
close the camera only twice (see
below). Remove the film,
THEN advance the counter to the
DOT in
preparation for a new roll of film.
|
|
Minox C (later),
BL, LX/TLX and EC
- Frame counters start at 36 and
DESCEND to zero.
- Counter indicates the number of
frames REMAINING to be exposed.
- 36 exposure film loads must be
inserted with the counter set at the
red DOT!
- Exposing the nominal number of
frames should bring the counter to
zero.
|

|
15 exposure film loads -
- must be inserted with the counter
set at the red BAR!
|
If you use less than the
nominal number of frames, be sure
to advance the frame counter to the CORRECT POSITION
before loading a new cassette.
 Knowing when to
START. The "leader" of the
film strip is, of course, exposed during
manufacture, as is the area between the chambers
(with the crescent shaped notch). Closing the
camera after inserting the cassette advances the
film, BUT not enough to guarantee an unexposed
"first" frame. To insure an undamaged first image,
YOU MUST OPERATE THE WINDING MECHANISM
ONE MORE TIME, to get the counter
to the zero mark. Knowing when to
START. The "leader" of the
film strip is, of course, exposed during
manufacture, as is the area between the chambers
(with the crescent shaped notch). Closing the
camera after inserting the cassette advances the
film, BUT not enough to guarantee an unexposed
"first" frame. To insure an undamaged first image,
YOU MUST OPERATE THE WINDING MECHANISM
ONE MORE TIME, to get the counter
to the zero mark.
The film example shown is AgfaPan APX 25 which
was inserted into, and removed from, the camera in
very low light. Had it been fast film and subjected
to bright light, some leakage through the felt
light trap would have damaged the clear area
rendering an important image, if placed there,
useless.
Knowing when to
STOP. It is no accident that
the DOT is two frames AFTER
the end of the film for which your model was
designed (36 or 50 exposure). Advancing through two
frames at the end of your roll ensures that the
last image will be safely protected within the
take-up chamber before exposing the cassette to
light. It also positions the mechanism for the
insertion of a new roll of film, without operating
the winding mechanism through a full count to get
back to the load point.
The much more dangerous prospect is that
advancing the film too far, continuing until the
tail of the film is drawn into the take-up chamber,
leaving the light trap empty and less effective
than designed. Always leave film
extending between the chambers to maintain the
integrity of the takeup chamber light trap!
So, load film at the
"load point" and stop at the proper "end
point".
|