|
a bit
about Density Range & Scanning
When evaluating a scanner, consideration should
also be given to the density range within which the
scanner can distinguish variations, and the
linearity of the differentiation. Scanners are much
like film in that "blocking" can occur at both ends
of the density range, with compression especially
troublesome in the dense areas of the negative. I
am sure it is just a matter of time before scanning
a negative, even direct digital capture, will be
the method of choice.
|
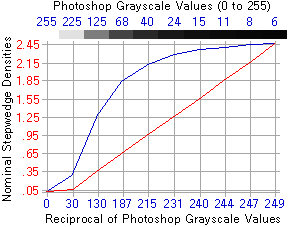
A Kodak Uncalibrated Step-Wedge was
scanned with a Nikon LS-1000 "slide"
scanner. The standard "factory" setting
was used. Each density block of the
resulting Photoshop image was evaluated
with the Histogram function. Since zero
density is represented with a value of
255, the "inverted" values were used to
plot the blue curve at the right. The red
line represents the density of each block
of the step-wedge.
Don't try to adjust your monitor - a
Photoshop grayscale value of 38 is 85%
black, so, even with a properly adjusted
monitor, you may isolate the "40" block,
but it is unlikely you could distinguish
the five values between 24 and 6.
I have as yet been unable to
pre-scan manipulate the curve to
approach a straight line response.
|
|
|
|
The argument is frequently given that a
photographic negative can store a greater
density range than a photographic print.
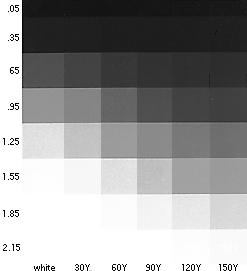
To test the practical implications of this
argument, the step-wedge described above
was projection printed on Zone VI VC paper
using the filtration settings shown. An
attempt was made to print the 0.05 density
as maximum black while showing an
appropriate difference for the 0.35 block.
To eliminate development variations, all
exposures were made on a single sheet of
paper. The silver print was scanned into
Photoshop with default settings
(Brightness 125, Contrast 125) and is
reproduced here. No manipulation other
than slight sharpening was done.
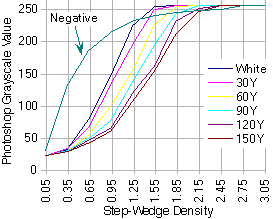
The grayscale density values were taken
from the Photoshop files of both the print
sheet and the negative scan, as described
above. The values were inserted into a
spreadsheet and the plot function
exercised. The result is displayed below.
|
|
It is clear that a negative scan
produces results which are quite different
than those obtained by scanning a silver
print, regardless of the grade of paper
used.
|
The
"personality" of the images
produced by the two methods is
quite different!
|
It is also apparent that, even with very
soft paper (in this case 150Y filtration
with variable contrast paper) there is
little usable density variation above the
step-wedge density of 2.15, a point at
which negative density increases also are
of little value. In fact, if the objective
in B&W photography is to produce a
negative which prints on number 2 paper, a
negative with a density range below 1.55
is desirable (I prefer the vicinity of
1.30). Within this density range, it
appears that either a negative OR a print
can yield acceptable results.
Since neither the digital printer nor
photographic paper respond to linear
increases in light with proportional
increases in density, producing an
expressive print remains an ART rather than a SCIENCE.
|
|
|