|
Some thoughts about
Exposure
Expose for the
shadows, ....
The instruction to "Expose for the shadows,
develop for the highlights." simply guides us to
expose the negative long enough to activate the
silver halide in the most dimly lit parts of the
scene FOR WHICH WE WISH DETAIL ON
THE PRINT. The wonderful old SEI Exposure Photometer allowed one to
measure either the darkest part of the scene in
which some texture is desired (Zone II) , or the
lightest (Zone VIII+). It allowed exposure settings
for ASA speeds from 1 to 32,000, f/stops from 1 to
32, and shutter speeds from 2 hours and 40 minutes
to 1/500,000 second.
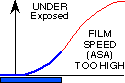
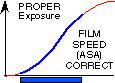
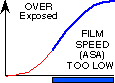
If the blue bar represents the range of light in
the scene, the negatives will have the following
characteristics.
|
|
|
In this example, too little exposure is
given and the lower values in the scene
produce zero density in the negative. Most
of this negative will be clear, only the
middle and high values being recorded.
|
|
|
|
By adding exposure, the darkest areas
are moved into an area of the curve where
differences in exposure create more
significant differences in density, thus
more contrast or "separation". The clouds
are still printable.
|
|
|
|
Adding more exposure assures that the
shadow areas have the maximum separation.
This is wonderful, EXCEPT that the high
values in the scene are now bunched
together or "blocked" because differences
in light make no differences in the
negative density. The clouds are now gone
and we have a "bald" sky.
|
The trick is to provide enough exposure to
get all of the desired information recorded. If you
provide too little light (exposure), areas of the
negative will have no "activated" emulsion, and,
when developed and fixed, will be clear and void of
information. This might lead to a suggestion that
you always provide an excess of light (exposure),
but each film has a limited ability to react to
increased exposure and a saturation point can be
reached.
Color reversal films (Kodachrome,
etc.) have a very limited range and require precise
exposure. Since portions of the scene will often
fall beyond the range of the film, the best
approach is to establish a preferred film speed
through experience and testing, then, for critical
images, make several exposures (bracket), varying
the exposure slightly.
Color and black-and-white
negative films tend to have a range which
varies somewhat with the film speed, slower films
having finer grain and narrower ranges. Each
require a different attitude toward exposure.
Historically, it has been good practice to make
the least dense negative which included all of the
desired data. Increases in exposure tend to
exaggerate grain in silver emulsions. Oddly, just
the opposite is true for chromogenic (color based,
color film and Ilford XP2 Super B&W) emulsions,
wherein increased exposure tends to minimize grain.
Having said all that, there is still only one BEST
exposure for every negative. Your job is to find
it!
Exposure meters generally provide data on the
assumption that whatever you are measuring should
ultimately print as "middle gray", defined in the
Zone System as Zone V. So, if your film speed and
development procedures have been accurately
established, and your meter properly set,
regardless of whether you use a hand-held
reflection type meter, in-camera meter, automatic
camera, or spot meter, exposing a blank wall of
ANY shade at the meter's
suggested speed and aperture, should provide a
negative of medium density.
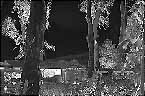
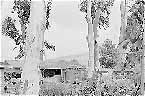
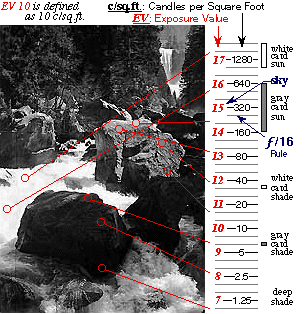
The image below was made, in the late '70s, from
the Vernal Falls Bridge in Yosemite National Park,
with a Minox IIIs, and AgfaPan 25 film. It
represents my worst nightmare. With a luminance
range of ten plus stops, near and far objects,
motion that needs to be precisely stopped, AND the requirement for a fine
grained film.
In addition, this image illustrates the
limitations of the f/16 Rule - "In
bright sunlight, normal exposure is 1/ISO at
f/16".
|
|
In the scene at the left, dark base of
the rock meters EV 7 while sunlit white
water highlights show EV 171/3. If the exposure is
made using the f/16 Rule, placing Zone V
at EV 142/3,
everything below EV 112/3
(Zone II) will show no texture in
the negative and print as pure black. This
is fine for scenes with a 6 to 7 stop
range and little important shadow detail
and is ideal for color reversal film,
where overexposure is the worst evil. With
negative film, and especially
black-and-white, the best, and equally
antique, rule is "Expose for the
shadows, develop for the highlights."
If texture is desired in the dark rocks in
the Yosemite scene, an exposure placing
Zone V in the EV 11-12 range is required.
This is nearly 4 stops more exposure than
suggested by the f/16 Rule! Your placement
of Zone V will be conditioned by the
development scheme (plus, normal, or
minus) chosen PRIOR
TO exposure as part of the
visualization process!
It does add a whole new challenge in
that -
- the high values now are hopefully
not beyond the shoulder of the film (as
here), and
- control over the appearance of the
water is severely limited, and
- exposure AND development become
critical, the latter affecting the
former.
|
|
BE WARY OF SUNLIT
READINGS OF GRAY CARDS! Only a small change in
the angle, WILL alter the
reading SIGNIFICANTLY! As
can be seen, a full 2 stop range was
recorded by only slightly moving the card.
Reflectivity from the surface of the paper
is the culprit! The overhead clear
blue sky gives about the same result as
the sunlit Gray Card, as will an incident
light meter, ...and the f/16 Rule.
|
So how do you know how much exposure is
needed to activate the silver halide in a
particular film? The manufacturer will give you a
hint, but you should experiment for yourself to
find the correct Film Speed for your equipment and
technique.
|